
Today I’m sharing the work of Ryan Dunfee, who has created an amazing 3D HeroQuest board, in addition to doing some woodworking and tabletop terrain.

To Play Is Human: How did you get started with tabletop game and accessories crafting?
Ryan Dunfee: I got into crafting pretty early in life but the stuff I show on my social media has really only been since January. I have always had an interest in building things with my hands and had actually registered my own business (Sentient Robot Handcrafts and Games) with the hopes of turning it into a side gig and maybe some day a full time gig. Unfortunately, for the longest time I had very little in the way of time to actually practice and work on technique and products. That changed before Christmas last year when I was laid off from my software development job of 5 years. After the appropriate amount of grieving time I decide to start working on my own projects. I learned a lot from YouTube woodworkers, tabletop crafters, model railroad people and general hobby folk and then started in on a few projects.

I’m lucky to have access to a garage full of woodworking tools so I started with something I’ve always wanted for myself, a really nice dice box. When I showed off my first prototype people loved it and I decided to do two small runs to sell locally. For the hell of it I also threw them up on an Etsy store I abandoned years ago. I sold most of the 26 boxes I made locally but some made it over 4000km away!
When I found a new full time job I had to slow down but that is when I got into tabletop crafting. I started small with a few things like dungeon tiles and buildings for my own games (including a tabletop game/rule system I am building from the ground up).
TPIH: Tell me a bit about the HeroQuest board you made. How did the project come about, what was the process, what kinds of tools/supplies did you use?
Ryan: I am part of the organizing committee for Hal-Con, the largest Scifi and fantasy Convention on the east coast of Canada and one of the largest volunteer run conventions in the country. As part of that I do a lot of work with charities and events around the city. Usually what happens is a business or charity asks us to attend their event to bring a bit of fun and excitement. We show up with a bunch of people in costume (everything from movie to comic book to video game characters), take pictures with people and try to help out and raise money the best we can. I have met a lot of likeminded people through my time at Hal-Con and Josh, the now owner of the HeroQuest board, was one of them.

He had reached out because he had seen the work I was doing via social media and was wondering if I would take on the project. He sent me a few pictures, we talked for a while about what he wanted, I built a shopping list and then started working. He even lent me a giant box full of HeroQuest stuff so I could learn a bit about it and do the project justice.
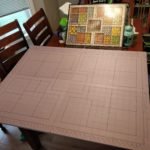
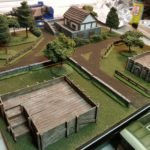
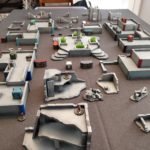
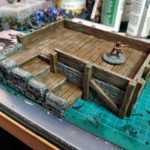
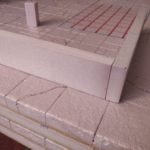
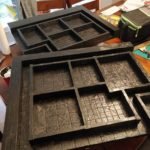
I started by getting the sizing right. We talked back and forth, I made a few tiny sample pieces and we decided on the grid size and wall size that worked best for him. We ended up going with walls an inch and a half tall, a half inch thick and squares an inch and a half across. He wanted the walls to be beyond the top of the model’s heads and this gave us the best ratio of play size to wall stability. Even in the smallest sections you can still place minis without issue and I think that was a super important goal for the overall playability of the board. Because of that though, the board ended up being slightly bigger than 3 foot by 4 foot. For ease of storage I segmented the entire project into quarters.
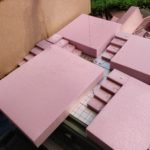
I started by cutting foam and hard board to the right shape on the table saw. These would form the base of the project, 4 sections roughly 19 inches by 24 inches. I glued the foam and hardboard together to make sturdy sheets I’d form the rest of the project on top of.
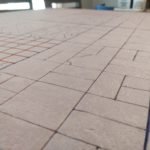
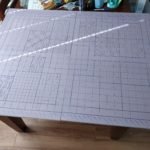
Next I laid out a grid on all 4 boards using a pen and exacto knife. I then took and drew the floor layout onto the grid based on the original game. When I had the room layouts all finished I went room to room and carved the unique floors into each one using the same exacto, a pen, a sharpie and at one point a wire brush. I then went over everything that was supposed to have a stone texture with a crumpled up ball of tinfoil. I would go rougher on the areas that were supposed to be rough stone and lighter on the areas where it was more of a smooth tile.

After the floor was laid out I started on the walls. They were fairly straightforward but SUPER tedious. I used my Proxxon hot wire cutter to cut strips of foam to the right height and thickness and then I went over the whole thing with a giant ruler to lay out the brick pattern and carved the whole thing in with an exacto and pen. Any slips I made I just turned into cracks in the brick. I then used the same tinfoil ball technique to texture the bricks. My hands hurt for a solid week afterwards.

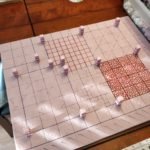
When I had everything textured I started installing everything. I started by putting in slightly different style corner blocks. I used a hand drill/pin vice to drill holes into the board and into the wall corners and inserted a toothpick into the core for extra strength. When all the corners were laid out I measured the distance between each one, cut a section of wall, drilled out support holes, added toothpicks and glued them in place. This took a while but it made it so every wall fit snug, was secure and looked right.
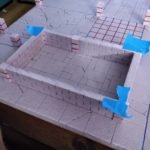
When all the interior walls were installed I measured and installed the outside walls. These were thicker to allow the board to be bumped without damaging the play area. I did not have foam thick enough so I ended up sandwiching slices of foam until I got the thickness I wanted and glued them down. I used a tinfoil ball to give them a texture but did not add a brick pattern so it would come across as more of a rough hewn/carved stone wall like the entire dungeon was carved out of bedrock.

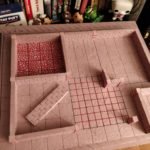
With all the walls installed I could go onto finishing steps. used a ton of foam brushes, sandpaper and woodland scenics flex paste to fill all the holes, smooth the tops and blend everything together. This was super fussy and I’d probably try something else next time but it turned out well in the end.

With the building all done I switched to painting. I started by hitting everything with a layer of black paint and pva glue as a base coat. It hardened the whole project up and made it way more durable. I then took and went over it again with an air brush and black primer to knock down some of the shine from the previous layer. After the base coat was down I started laying out blocks of color. painted all of the walls using a mix of grey paints and then laid out a base color for every room sticking close to the colors of the original board. After the main colors were finished I went back and did a drybrush on everything with a color lighter than the base color of the room. This brought out all of the texture from the build steps and it was the point when I knew this project was going to be a success.

After all of the rooms were done I hit everything with a black wash to darken the recesses and painted the tops of the walls with a flat black and the board was done! Almost!

The biggest thing I got asked when showing off my work in progress pictures on the various Facebook groups I’m part of is “how are you going to do the doors” “dont forget the doors” “omg you cant do this without doors”. I had a plan for these from the beginning. I built some basic 3D models in my favorite 3D modeling tool for quick jobs: Tinkercad. I had the wall measurements so I built the doors so they would be slightly thicker than the walls and slightly taller. I then used a boolean operation to cut out the area and BAM I had a set of doors that would slide over the wall easily. I took that model and made 3 other variations. Josh had requested 20 open doors, 8 wooden doors, 4 metal doors and 1 fancy door. I own a 3D printer but unfortunately it died 6 doors into this step. I ended up submitting the models to a printing service and had them a week later. I based them in black, used the same grey I used for the walls, painted the doors the appropriate color and game the doors a wash of black. I did not wash the stone just to give it a tiny bit more contrast from the rest of the walls.


AND THEN the project was finally done. I delivered it on Tuesday, the same day I posted my completed project on the Tabletop Crafters guild and my local hobby group.

TPIH: What does your work space look like and what tools do you always have nearby?

Ryan: I have two spaces I use regularly. First is the spare room in my condo. It’s a little cramped, especially when I have multiple projects going on but it works for now! I always have my hot wire table, lots of paint brushes, pens, exacto knives, rulers, cutting mats, files and random tools for working on whatever the project of the day is. Sometimes when I am working on a larger project (Like the hero quest board) or if I am taking pictures of projects I’ll take them out to the dining room table where there is plenty of space and light.


My other space is actually not mine. It’s my parents. They live about a 15 minute drive away and in my dad’s garage I have access to a table saw, chop saw, band saw, planer, a few routers and all the hand tools I could ever want. Dad is retired so he often comes out and lends a hand when I’m puttering around in the garage working on something.

TPIH: I loooove seeing the spaces that people work in! It’s so great that you can share part of the hobby with family. What keeps you in the tabletop crafting hobby? What do you love about it? What does crafting do for you?
Ryan: Crafting has always been a joy for me. I love being able to look at a project when it is done and think “Look at this cool thing I made!”. Crafting and working with my hands in general has always been therapeutic for me. Working at a desk job I look forward to getting home and making stuff in the free time I do have. I enter a zen mode when I am crafting, or painting and the stress just melts away!

TPIH: What advice would you give to someone thinking about getting into tabletop crafting? And, are there any specific resources you’d direct them to?
Ryan: Start small! Work on techniques on smaller projects and then when you feel you’ve nailed it, do it 5 more times and then move on to larger projects. I often fly by the seat of my pants with my projects but its a good idea to plan out anything larger than a small house. Houses were actually one of my practice pieces starting out. I looked at how log cabins were actually built and used those techniques to work through the project, adding details whenever I could. This is probably my first big tabletop piece. It is the house that my D&D group uses as their headquarters and it took about a week to build.


As far as resources go… by far my biggest thing is Youtube. Watch videos from everyone. From the tabletop crafter folk and model railroaders all the way to documentaries on how to build historical castles and buildings. You find inspiration in the most unlikely places some time so I actually get in the habit of emailing myself and using the Gmail star feature to organize all of my random thoughts into one place where I can pick through them later. I take screenshots of things I like on facebook and will store them away to sort through when I get inspiration. Sometimes I go back to my starred emails and screenshots folders to find that I had no idea what I was thinking at that time but usually I come up with something else I like about that picture and go from there. The easiest advice I can give someone is to just consume art. You’ll find your own inspiration, your brain will pick apart the parts it wants to and you will come up with something unique. We live in the age of technology. If you have an idea there is PROBABLY a tutorial out there on how to do it.

TPIH: Do you have any “secret weapon” tools or products that you use in your crafting? Something that might have a different traditional use/purpose, but you’ve discovered has a perfect purpose for a specific crafting technique?
Ryan: I don’t know if I have one specific secret weapon or a bunch of things that help me do what I do. I have:
- a pasta roller clamped to my desk that I use to roll out Super Sculpey to a uniform thickness for when I want to make bases for my minis
- clay shaper tools (the ones that look like paintbrushes but with silicone tips) I use for doing slight indents in parts of for getting filler into deep corners
- 3D printer for building not only tiny add on models but also for building things like stamps to make oven bake clay coins.
- Proxxon hot wire cutter that I use for a lot of my big foam projects (It’s almost essential for some of the bigger projects I do. You can’t get a good uniform line across 4 feet of foam using a knife unless you have the steadiest hands in the world.)
- 4 different exacto blade handles all with different shaped blades for different uses.
Photo coming soon of the “corner of death”!
TPIH: What kind of gaming do you do?
Ryan: I am a long time Dungeons & Dragons player and recently got into Starfinder. I have a few Infinity armies for pick up games with friends as well and a bunch of tiny fun board games for those who might not like tabletop games as much. I’ve always been interested in the visual aspects of tabletop gaming so naturally I’ve collected hundreds of models over the years.
When I have a few friends over and want to play something we can just pick up quick I actually bust out the rules for the game I am prototyping, Songs of War. Its a tabletop skirmish game where you can use any size/shape of model. You use the rules to build simple stats and play a game over a half hour or so. On the surface it is a pretty standard tabletop skirmish game but the lore has the game being played from the perspective of two (or more) bards singing about a battle in history. As they are telling the story (or as each player is taking their turns) they may embellish their side’s achievements. These might be things like rerolling misses, your wizard having a flash of inspiration and his next spell becoming more effective, the weather turning to rain dampening bow strings, an extra warrior coming from off the board to assist and so on to effect the overall outcome of the game. I wanted a fun take on tabletop war games with a twist people haven’t seen before and I loved this concept when I was brainstorming ideas.
TPIH: I love your projects and look forward to seeing what you come up with in the future. Thank you so much for sharing your work with us!
Readers, if you’d like to find Ryan online, you can follow him here:
CALL FOR SUBMISSIONS
Do you have a tabletop gaming project that you’ve created? Contact me with some information and photos. No project is too big/small — as long as you made it yourself and you use it when you game, it is eligible for submission! I would love to see projects for board game upgrades and accessories, RPGs, miniatures (I would love to see mini paint jobs!), terrain, dice towers, custom playmats, custom dice, or anything else you have made.
Pingback: Meeple Monthly Roundup, August 2018 – Meeple Like Us